Monthly Archives: May 2015

Sliced Sprites

As part of my Candy Bubble Drop makeover, I was told that my ‘Rainbow’ shader didnt cut it, and so I was given a pre-rendered set of sprites with the bonus text lines nicely done up.

AS TEXT REWARD

While this was really nicely done, I would need to slice it into horizontal pieces with each word saved to a separate PSD file.  Being lazy, and thinking this wouldn’t be the only time I’d want to do this, I set about creating a custom NGUI Sprite that allowed me to specify a slice height, and then a slice index, so I could chose which horizontal slice I’d display at run-time.

Creating the custom NGUI sprite class was pretty straight forward.  I added a new script to my Unity project called PBSlicedSprite.cs and added the following lines:

Screen Shot 2015-06-01 at 5.22.10 PM

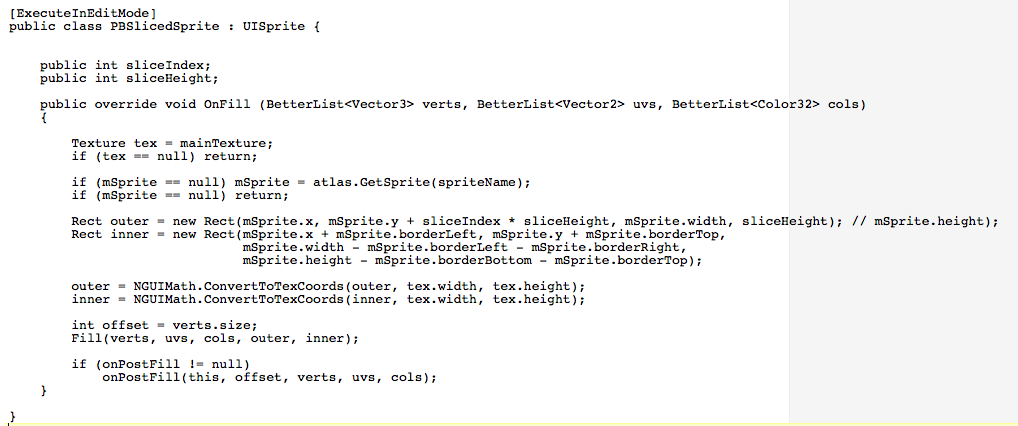
I basically just overrode the normal OnFill method, and used the sliceHeight as the sprite’s height, and the sliceIndex * sliceHeight to offset the starting position.  Note, that as this is an internal class (i.e. used by me) there is no error checking on the index, so negative or large values will have curious results.

With the class created, I needed to create a custom inspector for the class as NGUI will not display public vars in one of its fancy inspectors by default.  After a little research looking at other NGUI inspectors, I came up with the following:

PBSlicedSpriteInspector.csScreen Shot 2015-06-01 at 5.25.11 PM

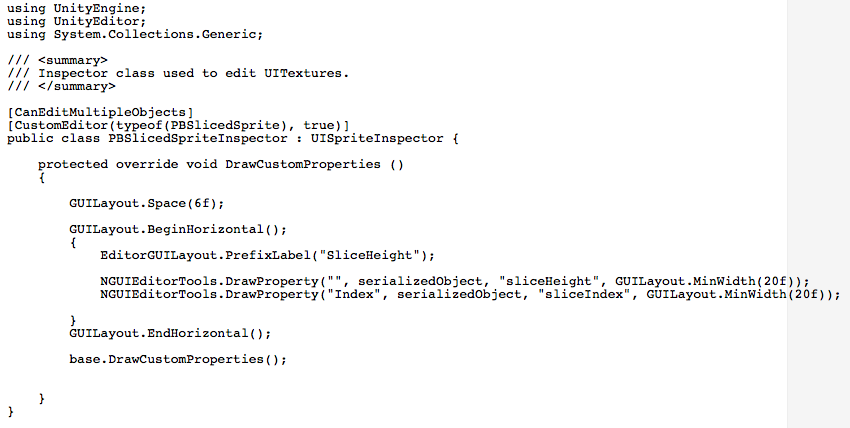
That inserts a line before the standard NGUI sprite panel in the inspector, allowing me to enter the slice height and the index in the editor, and adjust them in code.

I’m happy with the end result, and I’m pretty sure I’ll find a use for this class in future projects.

Let me know if you have any questions or comments.

Rainbow Shader (Screen Position as Texture Coordinates)

I wanted a ‘rainbow’ shader for Candy Bubble Drop – I have some text that will float up the screen when the player does something in the game that warrants a nice visual reward, and instead of plain white text, I thought it would be nice to have a multicolor text float up the screen and change color as it moves.

You can see the effect in the video below (all jerky right now – need to figure that out).  I’m just moving an NGUI UILabel around the screen after giving it my new material with the rainbow shader.

The shader grabs the screen position and uses that for the texture co-ordinates for each vertex. That way as the object moves, the texture changes – I thought it was pretty neat.  The shader code is below:

Shader "Custom/TexturedTextWithColor" {
   	Properties {
        _MainTex ("Font Texture (Alpha A)", 2D) = "white" {}
        _OverlayTex ("Overlay Texture (RGB)", 2D) = "white" {}
        _Color ("Text Color", Color) = (1,1,1,1)
        _WrapFactor ("Wrap Amount", float) = 1
    }

    SubShader {

		LOD 200
        Tags {
            "Queue"="Transparent"
            "IgnoreProjector"="True"
            "RenderType"="Transparent"
            "PreviewType"="Plane"
            //"ForceSupported" = "True"
        }
        Lighting Off Cull Off ZTest [unity_GUIZTestMode] ZWrite Off Fog { Mode Off }
        //Offset -1, -1
        Blend SrcAlpha OneMinusSrcAlpha

        Pass {	
            CGPROGRAM
// Upgrade NOTE: excluded shader from DX11 and Xbox360; has structs without semantics (struct v2f members scrPos)
#pragma exclude_renderers d3d11 xbox360
            #pragma vertex vert
            #pragma fragment frag

            #include "UnityCG.cginc"

            struct appdata_t {
                float4 vertex : POSITION;
                fixed4 color : COLOR;
                float2 texcoord : TEXCOORD0;
            };

            struct v2f {
                float4 vertex : POSITION;
                fixed4 color : COLOR;
                float2 texcoord : TEXCOORD0;
                float4 scrPos;
            };

            sampler2D _MainTex;
            uniform float4 _MainTex_ST;
            uniform fixed4 _Color;
            sampler2D _OverlayTex;
            uniform float _WrapFactor;
            
            v2f vert (appdata_t v)
            {
                v2f o;
                o.vertex = mul(UNITY_MATRIX_MVP, v.vertex);
                o.color = v.color * _Color;
                o.texcoord = TRANSFORM_TEX(v.texcoord,_MainTex);
                o.scrPos = ComputeScreenPos(o.vertex);
                return o;
            }

            half4 frag (v2f i) : COLOR
            {
                half4 col = i.color;
                float2 swap;
               
                swap.xy = _WrapFactor * i.scrPos.xy;
                swap.y += swap.x;

                col.rgb *= tex2D(_OverlayTex, swap).rgb;
                col.a *= tex2D(_MainTex, i.texcoord).a;
                //clip (col.a - 0.01);
                return col;
            }
            ENDCG 
        }
    }
}

The lines that make the ‘magic’ happen are:

     o.scrPos = ComputeScreenPos(o.vertex);

This code pulls the screen co-ordinates for the current vertex using a Unity3D supplied function.

The code in the fragment shader pulls those screen co-ordinates and then uses them to pull the texel from the Overlay Texture. I ended up swapping x & y to make the effect more pleasing when the text goes up the screen – I should have rotated the texture (which would be the more efficient solution). I set the alpha value based on the alpha from the font texture.

Welcome

Welcome to this ‘yet another blog’.  Here you’ll find useful things I’ve discovered in my Unity Adventures, some handy C# hints and maybe even some java ramblings.

Check back often, I’m sure this blog will update regularly…